Monday, September 17, 2012

Peach Day

The peaches around here have been great, and I've still been able to find them fresh at he farmer's markets. I'm hoping the same is true for you since our friend Lindsey has three fantastic peach recipes she's going to share with you today. 

I love fall.  I love going back to school, buying school supplies, feeling the crisp in the air, watching the leaves start to change, eating apples and peaches.  But my favorite thing about fall is "Peach Day."  Or that is what I call it.  Every year I go to Allred Orchards and buy a bushel of peaches.  Peach day really does take the whole day from the time I wake up until when I go to bed.  This year I made freezer peaches, freezer peach jam, and two peach pies.  

After I purchase the peaches I start by blanching the whole bushel.  This is my least favorite part of peach day because it takes forever, it is hot, and makes a huge mess.  By the end of peach day it looks like war has occurred in my kitchen between me and peaches.  First I made fifty bags of freezer peaches.  Once the peaches are frozen, they can be used to make the best peach smoothies, pies, cobbler, or for general snacking. 

Friday, August 19, 2011

Raspberry Pie

This weekend is a good weekend because I get to be home. My real home, the place I grew up, where there's always food in the pantry and my momma cooks me dinner. Or dessert. Or almost anything I ask because she loves when I come visit (and so do I, of course!) So this visit I told momma I was craving pie. Berry pie.
Specifically raspberry pie. So that's what momma made. I'm not really sure how she manages to roll out pie crust in the most perfectly round and even shape, pinching the crust into a beautiful rippled edge with such long (and vibrant!) nails. Probably because she's amazing, I'm guessing. I certainly can't do much of anything with nails that reach the end of my finger tips...

Tuesday, June 7, 2011

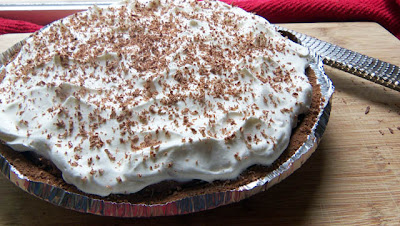
Chocolate Cream Pie

.

It's been a crazy couple of weeks for the two of us lil "chefs." Between teaching 2 intensive block classes, planning our class excursion (camping, hiking, etc, with 20 foreign students), grading dozens of essays every week, and frantically visiting with as many friends as possible before I move in a few weeks, I've hardly had time to think, much less cook. Oh, and Caroline has a brand new baby, which definitely trumps pretty much everything.

Tuesday, July 27, 2010

Apricot-Blueberry Rustic Pie

I never ate a whole lot of apricots growing up. I have an inkling that they were one of those fruits that my momma loathed...but that could be my imagination. I was reintroduced to them in dried form, replumped on the stove with a bit of sugar and water, and then topped with cream. Simply delicious.
These apricots were sneakily picked from my neighbor's tree. His house being vacant and the tree bursting with bright orange balls of goodness, I felt it was my civic duty to relieve the tree of some of its weight. The resulting galette was a perfectly summery, surprisingly juicy simple pie. 

Friday, March 12, 2010

Apple Pandowdy

Pandowdy, pandwody, pandowdy. Just saying this word brings a smile to my face. But what exactly is it? Think cobbler meets pie; fruit on the bottom with a pastry on top. It's a traditional dish found mostly in New England. A pandowdy is like having the deliciousness of pie, but with only half the work (you only have to roll ONE pie crust that doesn't even have to be circular. Plus you get to cut it to fit the pan). And this pandowdy has a sour cream sauce mixed with in with the apples. Yum.


Here's an interesting tidbit about pandowdy: Nancy Baggett, author of The All-American Dessert Book says "despite the rather plain look of the [pan]dowdy, many culinary historians...believe that the odd name does not refer to the appearance of the dish, but to the fact that it is covered with a 'dow,' a varation on the word 'dough.'" Though if you prefer, you can continue to extol its dowdy virtues.


Apple Pandowdy
Recipe from The All-American Dessert Book
Pictures by Caroline

3/4 cup plus 2 tablespoons packed light brown sugar, divided
5 tablespoons all purpose flour, divided
1 teaspoon ground cinnamon
1/8 teaspoon ground cloves
9 cups peeled, cored, and thinly sliced tart apples
1 tablespoon fresh lemon juice
1 1/2 cups sour cream
1/8 teaspoon baking soda

Single crust pastry dough
  1. *Preheat oven to 400 degrees F. Lightly grease a 9 x 13 inch baking pan. In a small bowl, stir together the 3/4 cup brown sugar, 2 tablespoons of the flour, the cinnamon, and cloves.
  2. In a large bowl, stir together the apples and lemon juice. Add the sugar mixture to the apples and stir until the are coated. Spread the aple mixture evenly in the baking dish.
  3. In the bowl used for the apples, thoroughly stir together the sour cream, remaining two tablespoons sugar, remaining 3 tablespoons flour, and baking soda. Spread the mixture evenly over the apples.
  4. Roll out the dough into a large rectangle, big enough to cover the 9 x 13 pan (this is much easier if you roll onto a piece of wax paper, then flip the dough over onto the apple mixture and peel the paper off). Trim the edges of the dough to make it even. Place the dough over the top of the apples. With a sharp knife, cut several steam vents in the top.
  5. Bake 40-50 minutes, or until the pastry is browned all over and the filling is bubbly. Let cool about 30 minutes.
*Directions paraphrased from original

Friday, December 4, 2009

Lemon Meringue Pie

There's lemon and then there's lemon. This is the latter. A good lemon dessert should make you go weak at the knees, and this one does not disappoint. It might even be almost as good as the perfect lemon tart.

To spread the meringue "decoratively" over the pie (as the recipe suggests), take a rubber spatula and smooth the meringue over the entire pie. Then gently press the spatula into the meringue and lift up, leaving small peaks behind. If your meringue isn't quite as stiff, your peaks will tip slightly, as you seen my did.

If you've ever made a pie with meringue, you know that it's in its nature to "weep," or slowly loose volume as the sugar begins to dissolve into a syrup. I've tried every "no fail" trick I've been able to find (room-temperature eggs, cold eggs, adding corn starch, chilling the bowl, etc), and still my meringue weeps. And shrinks, too. So don't be alarmed if your pie has a weeping, shrinking meringue; you've done nothing wrong. Hopefully one day in the future I'll be able to post some tips to making a perfect meringue, but for now, this one will have to suffice. I'm sure you'll manage to enjoy it nonetheless.


Lemon Meringue Pie
Recipe adapted from Gourmet January 2008
Pictures by Caroline

For Crust
Use a store bought crust to simplify things or try this recipe.
  1. Preheat oven to 375°F. Roll out dough on a lightly floured surface with a lightly floured rolling pin into a 13-inch round, then fit into a 9-inch pie plate. Trim edge, leaving a 1/2-inch overhang, then crimp decoratively. Lightly prick shell all over with a fork, then chill 30 minutes.
  2. Line shell with foil and fill with pie weights or raw rice. Bake until side is set and edge is pale golden, about 20 minutes. Carefully remove weights and foil and bake shell until bottom and side are golden, about 10 minutes more. Remove from oven and reduce temperature to 350°F.
For Filling:
5 large egg yolks
1 1/4 cups sugar
1/4 cup cornstarch
1/4 teaspoon salt
1 1/4 cups water
1/4 cup whole milk
1 tablespoon grated lemon zest
1/2 cup fresh lemon juice
2 tablespoons unsalted butter, cut into tablespoons
  1. Whisk together yolks in a small bowl.
  2. In a heavy medium saucepan, whisk together sugar, cornstarch, and salt. Gradually add water and milk, whisking until smooth. Bring to a boil over medium heat, whisking frequently as mixture begins to thicken.
  3. Remove from heat and gradually whisk about 1 cup milk mixture into yolks, then whisk yolk mixture into remaining milk mixture (this will prevent the eggs from cooking too quickly, leaving you with nasty looking scrambled bits).
  4. Add lemon zest and juice and simmer, whisking constantly, 3 minutes. Remove from heat and whisk in butter until incorporated. Cover surface with wax paper to keep hot.
For meringue
5 large egg whites, at room temperature 30 minutes
1/2 teaspoon cream of tartar
1/8 teaspoon salt
3/4 superfine granulated sugar
  1. Beat whites with cream of tartar and salt using an electric mixer at medium speed until they hold soft peaks.
  2. Increase speed to high and add superfine sugar, 1 tablespoon at a time, beating until meringue just holds stiff, glossy peaks.
To assemble pie:
  1. Pour hot filling into warm pie shell and gently shake to smooth top. Spread meringue decoratively over hot filling, covering filling completely.
  2. Immediately bake until meringue is golden-brown, about 15 minutes. Cool completely on a rack, 2 to 3 hours. Chill until serving.

Wednesday, September 16, 2009

Brocolli-Cheese Quiche

Quiche. Quiche in essence is an egg pie, which does not sound appetizing, but quiche is so much more than egg pie. It is creamy goodness. I like to combine the flavors of broccoli, onion, cheese, and bacon, but you could definitely experiment with other combinations. And quiche is great because you can serve it for breakfast, lunch, or dinner.

Broccoli-Cheese Quiche
Recipe and pictures by Caroline

1 pie crust (I used a pre-made crust, or you could try this)
4 beaten eggs
1 cup half-and-half
½ cup milk
½ med yellow onion, chopped
½ cup chopped broccoli
¼ teaspoon salt
1/8 teaspoon black pepper
Dash ground nutmeg
4 or 5 pieces thick slice bacon (or ham), cut into ½” pieces
1 cup cheddar cheese
1 tablespoon flour

1. Cut bacon into ½” pieces and fry in a skillet until cooked through. Put bacon on a paper-towel lined plate and set aside.
2. In a medium bowl beat together eggs, half-and-half, and milk until well combined. Add the onions, broccoli, salt, pepper and nutmeg. Stir in the bacon (or ham).
3. In a small bowl toss together the flour and cheese. Add to the egg mixture.
4. Pour egg mixture into pie crust (I like to place the quiche on a baking sheet while cooking to ensure that the quiche doesn’t overflow onto the bottom of my oven). Bake in a 325° oven for 40-45 minutes or until a knife inserted near the center comes out clean. Let stand for 5 minutes before serving.

Saturday, December 13, 2008

Peppermint Cheesecake

This cheesecake is a great holiday party dessert. It is quite simple to make, it looks and tastes festive, and people love it.


Peppermint Cheesecake:
Recipe by…Caroline’s sister-in-law Rebecca
Pictures by Caroline
Makes 2
*Or you can make one cheesecake from the same amount of ingredients, which will result in a much taller, "beefier" dessert (you will need to make it in a spring form pan if you do this). The picture above is using the recipe to make two cheesecakes.

56 peppermint candies, crushed (blend them in a food processor or put double-baggie them and hit them with a hammer)
1 8 oz. package cream cheese, softened
1 can sweetened condensed milk
1 pint whipping cream

1. Whip cream in a bowl until medium-stiff peaks form.
2. In another bowl, whip cream cheese and sweetened condensed milk until smooth. Stir in the crushed candies. Gently fold in whipped cream.
3. Pour mixture into chocolate crust and freeze for 5 hours or overnight.
4. If you want to make it look fancier, melt some chocolate and swirl on top once the cake is frozen.

Chocolate Crust:
Makes 2 crusts

2 ½ cups crushed chocolate wafer cookie crumbs
½ cup melted butter
½ cup white sugar

1. Crush cookies either by hand or in a food processor until they are crumbs. Note: I was unable to find chocolate cookie wafers, so I bought a no name brand Oreo cookie and scraped out the cream filling.
2. Combine cookie crumbs, butter and sugar. Press firmly into the bottom of two 9” spring form pans, or pie dishes.

Note: I like to make the crusts first and put them into the freezer while I make the filling so that they are a bit firm by the time I need them.

-Caroline

Thursday, December 11, 2008

Holiday Feast


Thanksgiving? Christmas?  Here are a few great recipes to help you make your feast perfect.

Cider-Brined and Glazed Turkey
from www.epicurious.com

Brine
4 quarts apple cider, divided
1 1/2 cups kosher salt
1/4 cup whole allspice
8 bay leaves
4 quarts cold water
1 20-pound turkey (neck and gizzard reserved)
  1. Simmer 1 quart apple cider, salt, allspice, and bay leaves in 20-quart pot 5 minutes, stirring often. Cool completely. Add remaining 3 quarts cider and 4 quarts water. Place turkey in brine. Cover and refrigerate overnight.
  2. Drain turkey and rinse. Arrange on several layers of paper towels in roasting pan. Refrigerate uncovered overnight.
Glaze
2 cups apple cider
1/2 cup (1 stick) unsalted butter
  1. Boil cider in saucepan until reduced to 1/4 cup, about 15 minutes. Whisk in butter. Cool completely.
  2. Set rack at lowest position in oven; preheat to 350°F. Remove paper towels from roasting pan. Pat main and neck cavities of turkey dry; stuff loosely with stuffing. Place turkey in pan, tuck wings under, and tie legs together loosely.
  3. Roast turkey 1 hour. Brush with some of glaze. Roast until beginning to brown, about 1 hour. Cover with foil. Roast until thermometer inserted into thickest part of thigh registers 175°F, brushing with glaze every 30 minutes and adding up to 1 cup water to pan if drippings begin to burn, about 3 hours longer. Transfer turkey to platter; tent with foil. Let stand 30 minutes.
Green beans, Roasted Fennel and Shallots
from www.epicurious.com
makes 6-8 servings

Nonstick vegetable oil spray
2 large fresh fennel bulbs, trimmed
3/4 pound shallots, peeled, halved through root ends
5 tablespoons olive oil, divided
1 pound slender green beans, trimmed
  1. Preheat oven to 450°F. Spray rimmed baking sheet with nonstick spray.
  2. Cut fennel bulbs lengthwise in half. Cut halves lengthwise into 1/2-inch-wide wedges, with some core still attached to each.
  3. Combine fennel and shallots in large bowl and add 3 tablespoons oil; stir to coat and arrange fennel and shallots in single layer on prepared sheet. Sprinkle generously with salt and pepper. Roast until tender and golden, stirring every 10 minutes, about 35 minutes.
  4. Cook the green beans in large saucepan of boiling salted water until crisp-tender, about 3 minutes. Drain. Rinse with cold water and drain again. Pat dry.
  5. Heat remaining 2 tablespoons oil in large skillet over medium-high heat. Add roasted vegetables and haricots verts; toss until heated through, about 3 minutes. Season with salt and pepper. Transfer to bowl and serve.
Carmelized Onions
from Kathy Hill
makes 6-8 servings

5-6 medium sized yellow onions
1/4 cup butter
salt and pepper to taste
  1. In a large saucepan, melt 1/8 cup butter.
  2. Slice the onions into thin rings and place in pan with butter. Cook for about 30 minutes, or until the onions are tender, adding butter if the onions begin to look dry.
  3. Season with salt and pepper and serve.
Cranberry Sauce
from www.epicurious.com

1 cup water
1 cup sugar
12-oz bag fresh or frozen cranberries (3 cups)
1/2 teaspoon freshly grated orange zest
  1. Bring water and sugar to a boil, stirring until sugar is dissolved.
  2. Add cranberries and simmer, stirring occasionally, until berries just pop, 15-20 minutes.
  3. Stir in zest, then cool.
French Apple Pie
adapted from Betty Crocker Cookbook

Crust: 9-pie pie crust or a pre-made pie crust

Filling
8 cups thinly sliced peeled tart apples
2/3 cup sugar
1/4 cup flour
1/2 tsp cinnamon
1/2 tsp nutmeg
1/8 tsp cloves
a pinch of salt
  1. Heat oven to 425.
  2. Mix all ingredients together except apples. Stir in apples.
  3. Roll out pastry and place in 8-9 in pie pan.
  4. Pour in apples.
Topping
1 cup flour
1/2 cup packed brown sugar
1/2 cup firm butter
  1. Mix flour all ingredients together and stir until crumbly.
  2. Sprinkle over top of apples.
  3. Cover during last 10 minutes of baking to prevent excessive browning.

Tuesday, November 25, 2008

9-pie Pie crust


My grandma is famous for her fantastic pie crust. Honestly, I've tried dozens of different recipes, but this one beats them all every time. Every major holiday my Grandma brings 6 or 7 pies of every imaginable flavor out to feed the pie-loving family of about 40 (including children, grandchildren, and a few great-grandchildren), rendering it extremely necessary to have a recipe that makes 9 pies.


However, if you, unlike my grandma, may not have such a pressing need for mass quantities of pie dough, you're in luck; this dough will keep well in the freezer for up to a year. I've actually found that it is much easier to handle after it has been frozen for a few days, so if you're planning on trying this recipe for any Thanksgiving pies, you should freeze it the day before you plan to use it.

9-pie Pie Crust
by Grandma K
Pictures by Caroline

5 lbs white flour
5 tsp salt
3 lbs shortening
5 tbsp white vinegar
1 3/4 cups water
4 eggs
  1. Mix the flour, salt and shortening together until it looks like putty.
  2. In a blender, mix the vinegar, water and eggs.
  3. Slowly add the water mixture to the flour putty and mix until smooth, being careful not to over mix.
  4. Divide the dough into 9 balls and place individually into air tight bags.
  5. Freeze for up to 1 year.
*To thaw, remove the dough from the freezer a few hours before use, or defrost in the
microwave on a very low heat setting.

-Kelly
Related Posts Plugin for WordPress, Blogger...